Sunday, June 30, 2019

A Little Crochet, A Little Sashiko and A Little fun on the Embroidery Machine

I've been keeping myself busy with a variety of projects.  When I went out of town last month I started a crochet project because it was easy to work on on the plane and in the hotel.


I used 2 skeins of yarn that I found in my stash to go with a pattern I had on hand.  I would have liked it a bit larger but this worked out just about perfectly.  I did have to modify the last row.  When I did it the first time I was about 50 single crochets short.  Ripped them out and finished up using slip stitches instead.


I've also continued doing some Sashiko projects.


No goal for them, more like busy work.  These too were started on the trip with no sewing machine access.


Last week I took the piece from above and made it into a zip pouch.  In the process I broke a needle sewing in the zipper into 4 pieces.  

And then there is my machine.  This month I took a one on one class at the store where I purchased the machine.  (Sharkeys Sew N Vac, Wildwood, FL) They offer an amazing support system for their customers. I learned how to take a line design and convert it into a machine embroidered piece or a machine applique piece.

Last summer I used many of the ideas in Minki Kims book Diary in Stitches  to do my raw edge applique quilt.  Now I have mastered how to use them on my machine for a slightly different look.


This one from last August


This one from last week


And this one from this week for a friend. also from her book.


I've also been working on several other items both embroidery and basic sewing.  They will be available for your viewing pleasure on July 18.  My day for the annual 12 Days of Christmas in July blog hop brought to you by Sarah over at Confessions of a Fabric Addict

Hope to see you then. 

Tuesday, June 18, 2019

Simple Note Cards for Quilters or anyone else who would like to give them a try


Today I did a presentation to the Big Cypress Chapter (my chapter) of the Villages Quilt Guild. The topic was on Quilters Making Note Cards.  This presentation is intended for the non card maker/scrapbooker. These are simple cards primarily using "stuff" found in a quilters working area. The only items that may not generally be found in a quilters work area would be card stock and double sided tape.


I have been making these note cards for between 10 and 15 years.  I started to make them when I regularly forgot to buy them to go with gifts I had made. I whipped up a card with what ever was in front of me. I also did all of my cards for Christmas for 2 or 3 years just for kicks and giggles.  Now I pretty much make them for any and every reason I need to write a note.

The various items that MAY be  needed, depending on the card type chosen, will be
a.  Card Stock/packaged blank cards (always purchased using a 40/50% coupon)
b.  Scissors (both paper and fabric)
c.  Iron and Ironing surface
d.  Cutting Mat and rulers
e.  Rotary cutter (both paper and fabric)
f.  Heat and Bond
g.  Double Sided Tape (always purchased using a 40/50% coupon)
h.  Sewing Machine
i. Sharpie or other fabric marking pen
j.  Pencil
k. Fabric Scraps
l.  paper or fabric for simple background  (Scraps, wrapping paper, card stock, scrapbook
m. a printer/copier

The first 4 cards are made without using a sewing machine


The first one was originally made with the help of kids.  Designs from coloring books are traced onto Heat and Bond, ironed onto fabric, cut out and ironed onto a card.  The fun part was using a sharpie to draw on the running stitch around all of the edges.


Next up are cards made with various phrases  printed out from  the computer and then layered onto a card using double sided tape.


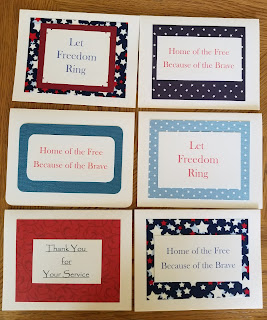
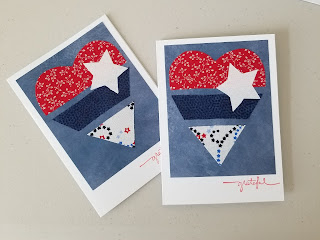
You will notice a heavy use of RWB in these card examples because the end goal of the presentation was to have the group whip up some cards for Operation Shoebox.


Number 3 is a card made to match a gift.  I made a quilt using this fabric, photocopied it, fussy cut / trimmed the photo copy and taped it to a card then made a matching gift tag with another scrap.


These same cards can be made by applying heat and bond to the fabric and ironing it to the card stock. These were not part of the presentation but cards that fit this category from my past


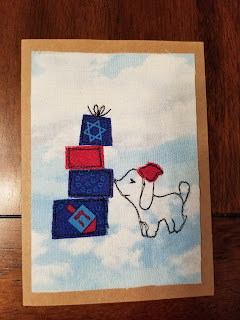
Card 4 is made using a shrunk down (I love my printer) quilt block pattern,  this one is from CELEBRATION TIME  a quilt pattern by Carol over at Just Let Me Quilt. I traced the pattern onto Heat and Bond , ironed it to some scraps, ironed the pieces to scrap book paper and layered it onto a note card.


Since this card will be the card I hope the group would work on I drew out lots of the pieces on paper and then photo copied it onto heat and bond by taping it to card stock and running it through my copier.


This card will be an ongoing item for Operation Shoebox.


Next came the cards using my sewing machine.  I used regular thread and whatever needle happened to be in my machine.

These cards are raw edge applique done on fabric then attached to the note card  


A simple bow sewn onto fabric and then directly sewn onto the card


and a Hanukkah card sewn on fabric and taped to the card. Both of these patterns are  from Minki Kim's new book Diary in Stitches 


This card is also from  last year. I designed it myself after doing the  2 cards above and did all of the stitching directly on the card.

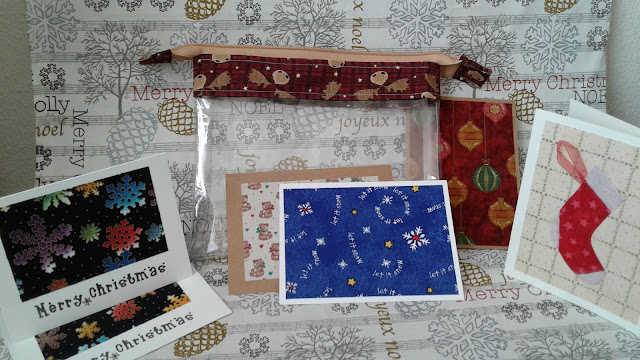
 Another super scrap buster are these note cards  from the book in the photo by Amanda Jean Nyberg of crazymomquilts


My final category are cards made using my embroidery machine.  I have vowed to myself that I will get my monies worth out of this machine and that it will not sit around collecting dust. 
So here are 3 examples of what you can whip up using an embroidery machine and a 4 inch hoop.


The first card is from Nancy embroideryitdesigns   It is a design actually created for a card.  I stitched it and then used watercolor pencils to highlight.


Card #2 was just an applique design I down loaded because I thought it would make another great card for Operation Shoebox  I just skipped the applique parts for the cards.  


I had a slight problem with these pieces that I discovered after sewing out 4 of  them.  They were just a tad big for what I wanted to do. Simple fix, 


just make a bigger card.

The pattern can be found at Embroidery-Boutique

And the final cards for the presentation are Red Work designs I downloaded from Designs by JuJu
which I stitched onto card stock, trimmed to the desired size, layered onto the note card.


I hope this was a stop that has given you something to think about and act on now that you see the simplicity of the process.  If you have any questions just leave it in the comment section and I'll be happy to get back to you.

Also if you try the note making process I'd love to see what you come up with.  Thanks for stopping by.

Tuesday, June 11, 2019

Catch Up - Big Time

I knew I hadn't posted in a bit.  I didn't realize how big a bit it's been. So I apologize in advance for the picture overload, but if I don't get them all in now I'll never get back to them.

One of the organizations I volunteer with is Operation Shoebox.  This group fills bags with misc articles for our troops overseas.  The bags contain lots of goodies such a HBA items, puzzles, snacks note pads, hand knit hats, snacks etc.  Each bag also gets a hand written note.  A couple of months ago a request for blank note cards came out to the membership.  The request coincided with the release of CELEBRATION TIME  a quilt pattern by Carol over at Just Let Me Quilt. I took one of the blocks from this great pattern and shrank it down to card size and made several fabric  cards.


I showed the cards at a quilt quilt meeting and we decided that I could do a demo class at some time in the future (it's next week) .  I don't want to limit the idea pool to just fabric so I've also made up some more traditional card samples for the demo using card stock and my printer.


Back to sewing and my embroidery machine,  I signed up for a series of class at my LQS to make a Christmas quilt using the embroidered paper pieced blocks by  Amazing Designs


While the blocks are very nice I have discovered that I don't like to paper piece no matter what the type of method used.  


So after making these 6 blocks I've decided that I'm not going to make the quilt.  I will continue with the class since there is always something to learn about my machine and its many talents from both the instructor and the other members of the group.


So come July there will be a new baby boy added to our family .  My niece and her husband are having their first child and as any good aunt I have been sewing away for the newbie. After seeing several of the baby quilts I have made over the last couple of years, she requested this family of giraffes by Lorna at Sew Fresh Quilts as  her quilt of choice. 


I then whipped out a receiving blanket using the tutorial by Jenny at MSQ.


And then just because I can and because they are so cute I made a couple of burp clothes using an embroidery design from Kreative Kiwi

Going back to Jersey I felt the need to upgrade my tote.  I have been carrying this
 Easy - Peasy Back Pack since last summer


So I classed up my look for the trip with this version


classic black on black


I made it reversible so that as soon as I got home I went back to being the retired fun loving me.


Since the baby shower was in NJ I had to find some hand work that I could play with while I was away.   I have been using an embroidery pattern set of Sashiko designs for quilting and decided to give Sashiko a traditional try.


So after some googling and you tube searching I started.  Having fun even if I'm not using the traditional colors.  For these items.  


I did order a traditional piece that I'm working on currently.


I've also been working on Small Kennel Quilts.  Due to the horrible flooding and now the wild fires requests have been coming in  at an alarming rate from across the country. More information can be found here


I have picked a couple of simple embroidery designs to use for the the quilting of these 12 x 18 pieces which speeds up my process.


And last but not least I'm working on a shawl.  Another hand carry around piece to work on in waiting rooms and at meetings.

That's all the pictures I have but I don't think it's all that I have been working on.  I will definitely have to pay more attention to the photo part of my creative process.

Until next time, take care.