Here is my best shot at a tutorial for using up fabric scraps for greeting cards. Because I was Thinking Christmas I had lots of Christmas fabrics out and about but please keep an open mind. Scraps of anykind work. This is a link to my stop on the Ghastlies blog hop where I show some cards, tags and bookmarks made with my Ghastlie scraps http://selinaquilts.blogspot.com/2011/10/my-turn-on-ghastlie-blog-hop.html
I started this group with drawing a snowman, a tree and a stocking on some scrap paper. I then photo copied them and made versions at various sizes.
I printed them out on card stock to make templates.
I ended up making cards in 2 sizes for this tutorial. The larger cards are made using store purchased blank cards I found at a close out in an art supply store. I know Michaels carries them. The small cards are just made using 1/2 sheets of card stock. The principles are the same. The key is using a good fusible bond. I use heavy duty Heat and Bond. The draw back with using it is that you can't easily do hand stitching through it. The card leading this tutorial had the stitching done after all of the bond was adhered and my fingers are still unhappy with me 2 days later.
My measurement for the backing is to cut it a half inch smaller than the card face. This gives it a nice clean 1/4 border of card stock.
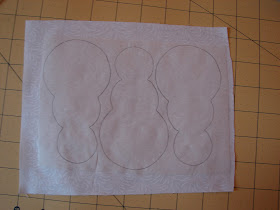
I made some individual cards and some that were more of a mass produced nature. Above is heat and bond on a single and below is heat and bond big enough for 3 blocks.
It does speed up the process considerably if you do the mass produce process. You really only need to be creative once. I made 8 different cards to start and they took about 15 minutes each to do. I mass produced the next batch in under 10 minutes a piece.
Ok, you have seen the templates they can be used on single pieces of fabric as in my snowmen
But you can make interesting fabric and get interesting outcomes
I thought that these scraps would make great trees.
Below are the finished trees from the scraps above.
You can also see an example of using one fabric and different size templates top right or just use a very cool scrap o fabric bottom right and let it showcase itself. The tree on the left is fused directly onto the card stock with no background as are the 3 trees top right.
this is a really creative process way easier than quilting. It's pretty much like applique without the neat stitches.
The stitching on the snowmen above are done with a pigma pen. The small snowman is done using a small scrap of background. There are no rules I am just sharing my visions .
Here is my mini mass production. There are 3 stockings here on the heat and bond. The background for the 3 are actually in a previous picture.
I made the cuff, heals and toes using fusible fleece just for fun. I used a ball point pen. I don't recomment that I just did it so you could see it in the picture, not. I have screwed up more things using a ball point but I never seem to learn that lesson.
So here are all the parts lined up for the iron
And the end result. Really much quicker than being creative one at a time.
These are the smaller cards. Again mush easier to make several the same. With the following exception
I was on such a roll I never noticed I had the card opening the wrong way.
Well I still had a few scraps left and a sheet of card stock so I set out to make some gift tags.
I just bonded the smallest tree to an edge and the straight part of the stocking to an edge. The stocking cuff, heal and toe are just the card stock. I cut out those pieces before bonding
I'm hoping you can see that the tags open, hard to photograph that concept.
So for my give away I planned on making 4 -5 cards for the winner. Due to the tutorial I made a few more than that. Maybe like 10 large cards and 4 small cards and 4 tags. So I have made the executive decision to have 2 give aways.
I also made my favorite fabric envelope to hold all of the goodies.
So tomorrow evening I will have MJ pick 2 numbers and I will post the winners.
I hope this attempt at a tutuorial has helped spark some ideas with you for the use of some of your accumulated scraps.
Please go and have fun with it.


Now that's just plain ole fun!! What a great way to use up those leftovers, and so much nice than a store bought card! I am off to find some card stock... :-)
ReplyDeleteWhat a wonderful touch to a Christmas Card! I love it. Thank you for sharing. Judith, Texas
ReplyDeleteThose cards are really cute, great idea!
ReplyDeleteThey look bright and cheerful, and a great way to use up scraps. I will have to give it a go ... Thanks for the tutorial
ReplyDeleteJudy
what a great idea for using scraps and ready for the holidays all at once, love the envelope too.
ReplyDeletewinderful idea and great tutorial. thanks
ReplyDeletequilting dash lady at comcast dot net
love these cards, I may well borrow som inspiration from you this Christmas.
ReplyDeleteLove the cards. thanks for the tutorial!
ReplyDelete